

Sorry that there aren't more pics here. I work pretty much entirely by myself and am often way too dirty and/or too distracted to be grabbing the camera. Some of these pictures have been posted in other threads, but I wanted to get them all in context in a single build description. Hopefully someone will get something useful from this, in which case it was worth writing up. Sorry that there isn't more solid tech info here (I tend to think in terms of systems instead of details), but there are a lot of variables involved and the details of some of the subprocedures are widely available on the 'net. Read on and enjoy!
Not long ago, my quest for better trail performance got me looking at lower gears to slow things down a bit and to give me better control in large, steep rocks. I already had the lowest gears I wanted in the tranny and diffs, so the next step was low gears in the transfer case. Since I mainly use my rig for trail riding, a single super low transfer case was out. Because I'm a cheap bastage, bling cases were out, too. What I settled on was a 203/205 doubler kit from JED's Machining.
The JED's kit is very similar to the first generation ORD doubler in appearance. The kit includes adapter plates that mount to the NP203 and NP205 boxes and a modfied 203 range box output shaft that now serves as the intermediate shaft between the boxes. The adapters are available welded together or unwelded. I chose unwelded so I could clock the 205 to where I wanted it. The doubler gives gear ratios of 1:1, 2:1, and 4:1 with the stock gearing. With a Wagoner Machine 3:1 kit in the 203 range box, the gear ratios increase to 1:1, 2:1, 3:1, and 6:1. If you twin stick the 205 to get individual control over the front and rear outputs, you end up with a very wide variety of gearing and drive options and a whole slew of shifters sticking through the floor boards. And believe it or not, on a technical trip I use all of these options.
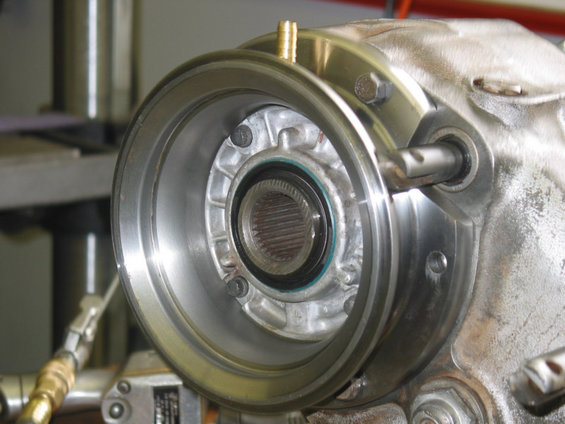
Close up of 205 half of doubler kit
![Image]()
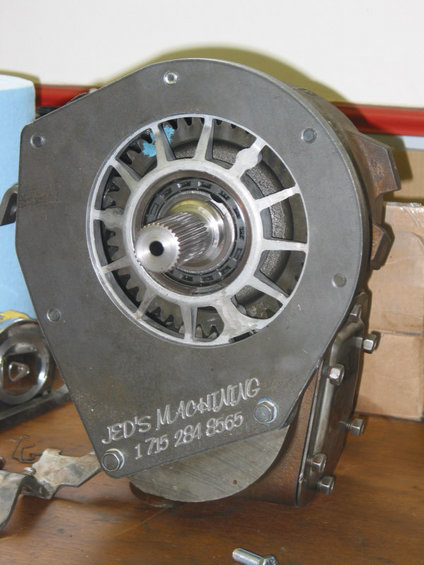
203 side of kit showing machined intermediate shaft
![Image]()
The first step in installing the doubler is to prep the transfer cases. For the 205, this means cleaning and resealing, rebuilding if necessary, and twin sticking if desired. I just cleaned mine up and twinsticked it. The case was very clean inside so I chose to put off a rebuild for a while. My case came with 1310 u-joints, so I swapped my 1330 joints from my NP208 case along with the correct output shaft seals (National 473457 to fit 1 7/8 seal surface on the yoke).
The NP203 is marginally more difficult to prep. You must separate the range box from the chain box since the range box is the only part you are interested in for this project. It's a bit of a struggle to separate the two halves due to some linkage, but it's not bad. What you have to watch out for is when you pull out the intermediate shaft; roller bearings go everywhere! Once the case halves are separated, remove the shift linkage that used to connect the two halves, and clean and inspect the range box. Finally, send your intermediate shaft off to JED's with your doubler kit order.
When the doubler kit arrives, unpack the adapter plates and start putting the cases together. On the 203 side, reassemble the intermediate shaft into the bearing retainer and reinstall it into the range box. Coat the inside of the shaft with heavy wheel bearing grease and reinstall the roller bearings that came out when you disassembled the 203 boxes. Install the adapter plate onto the 203 to hold the bearing retainer and intermediate shaft in place. From what I could see, you need to reuse the gaket on the rear face of the 203 box. Don't seal things up at this point because you'll be taking all this apart again at least once.
![Image]()
For the 205 side, assembly is pretty easy. Attach the adapter plate and check for shift rail clearance. I had to remove quite a bit of material to get the rear output shift rail to slide fully forward. A little time with a die grinder and some polishing rolls and it worked great. Now, put a little grease on the intermediate shaft splines and joint the two cases. Make sure the adapter halves are fully seated against each other and throw on a ratchet strap to keep them there.
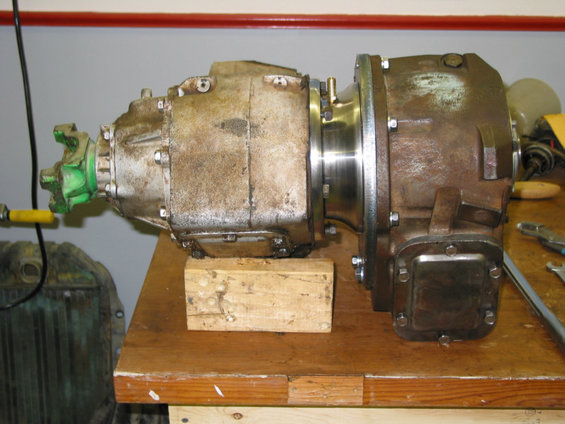
Fitup of all the parts.
![Image]()
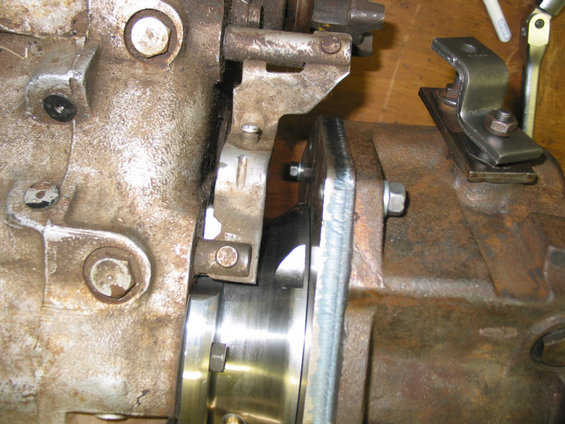
This is the notch that needs a little massaging to clear the rear output shift rail
![Image]()
These next steps are really dangerous. You will be raising this 285 pound chunk of cast iron over your head on a potentially unstable tranny jack. Be sure everything is very secure and solid before jacking up the doubler. If you need to clock your 205, you'll have to do this twice. BE CAREFUL, BE SAFE!!!
Under the truck, look things over real close to see where the floorpan clearance issues might be. Remove the factory transfer case. Put the doubler assembly on a strong transmission jack and slide it under the truck. Jack the doubler into position and attach it to the tranny output. If you are clocking the 205, this is when you mock up your driveshafts and determine final positioning for the transfer case. I chose to clock the 205 even with the bottom of the 203 as seen from the side of the truck (horizontal bottom line on the driveline assembly). This required me to raise the 205 about 2 inches at the front output shaft. You can order the doubler kit with this 2" raise already done if desired. Mark the adapter halves relative to each other so you can line them up later and remove the doubler from the truck. This is also a good time to measure for new driveshafts and get them ordered.
![Image]()
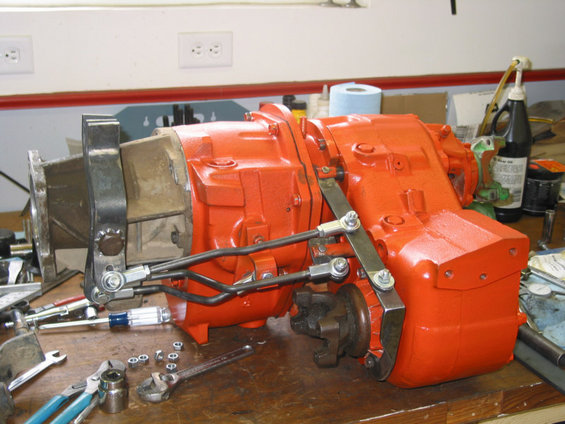
Back on the bench, separate the two cases and remove the adapter plates. Be careful not to pull out the intermediate shaft and lose all the bearings again. Put the adapter halves back together with the witness marks you made earlier aligned and place the whole works into a press. (You can do this by piling on weights as well, but a press works quite well). Clamp the two halves firmly together (JED's recommends 600 pounds minimum), and tack the adapters together. I chose to finish the welding with the adapter in the press and left it in there to cool as well.
On the bench again, install the adapter to both cases. Be sure to include the 203 rear face gasket. Silicone everything and use Permatex #2 on the bolts. My doubler is leaking at several bolts and will need to be removed for resealing. It's not a job you want to do over and over, seal it up the first time. By this time, you will have noticed that you don't have a check and fill plug for the 203. There are several options for dealing with this. What I chose to do was make a new cover out of 1/4" steel which I drilled and tapped for a 1/2" pipe plug between the top bolt holes. I made a similar plate for the 205, but omitted the fill plug.
Adapter welded up and the doubler halves joined. The yokes have not been swapped in this pic.
![Image]()
Now you have to deal with shifters. I've included pictures of mine, but there are so many possibilities that it's pointless to go into detail. The easiest situation is if you did NOT twinstick the 205. You can buy a twinstick (203/205) shifter from several places which make the shifter a true bolt-on solution. If you did twinstick the 205, your shifter design depends on how you want the levers ordered, how much you're willing to hack up the floor, and whether or not you want a stock appearance or if the shifters can just wind up anywhere. I wanted my shifters to mount in the stock location, to come up through the factory transfer case shifter hole, and to be ordered rear-front-crawler. Of course, this is about the most difficult setup to put together, and it took me two or three weeks of head scratching and modeling to find a solution that didn't bind and didn't interfere with other components.
Finished shifters. It took a long time to get to this point.
![Image]()
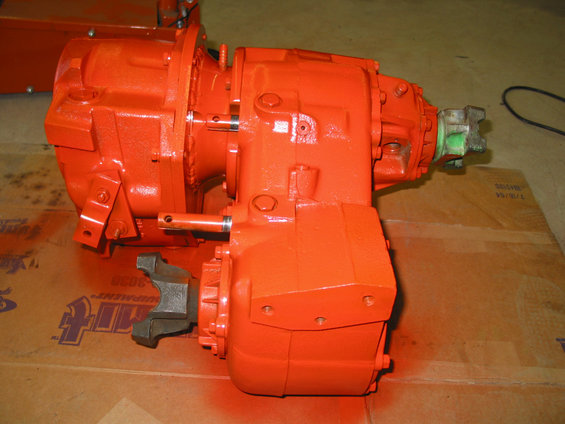
Once you have the cases bolted together, sealed, shifters done, and yokes installed, it's time for a final cleaning and painting. Now we head back under the truck, hopefully for the last time.
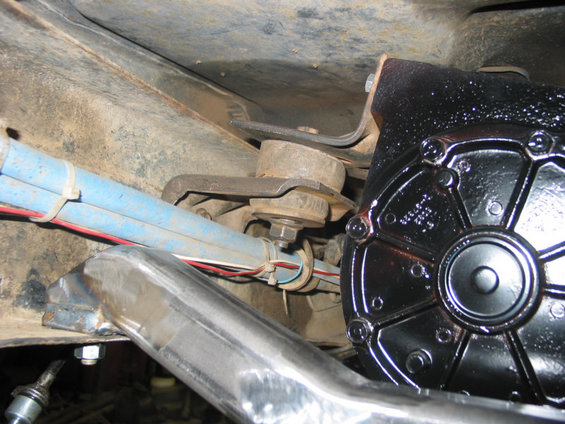
The final set of steps after installing the transfer cases are to make up the crossmembers. As I mentioned, the doubler assembly weighs 285 pounds. The tranny and tranny adapter are not designed to carry this load. Therefore, you need a tranny crossmember, a doubler crossmember, and a torque arm to keep from transmitting output torque back through the tcases, tranny, engine, and engine mounts. If you have a low lift, you should be able to reuse the stock tranny crossmember. There are several ways to build the tcase crossmember, the easiest of which is probably to weld something to the 203 adapter plate. As for a torque arm, Ford has us covered there. Just use the stock 205 frame mount, it works great.
Ford NP205 frame mount. It's tight with the fuel injection and brake lines in there.
![Image]()
Unfortunately, with my lift (6 - 7 inches), I had to build a tunneled tranny crossmember which now interfered, no, blocked, my transfer case shifters. This meant I had to move the tranny crossmember forward to clear the shifters. I also didn't want to pull the doubler out to weld new mounts onto the adapter, so I needed a creative solution for the transfer case crossmember. Past experience with a couple skid plates taught me that the frame must be allowed to flex or bolts come loose and things fall apart. So, what I chose to do was to use skinny crossmembers mounted outboard the tranny/transfer case assembly. The mounts would try to twist the crossmembers, so they would be braced against the frame and gusseted with the skid plate. I used a GM transmission mount for the tranny, and another bolted and welded to the 205 inspection plate I had made to mount the tcases. It's a funky setup, but so far works OK. I will be replacing it eventually as I don't trust it to hold up over time, but for now it gets me on the trail.
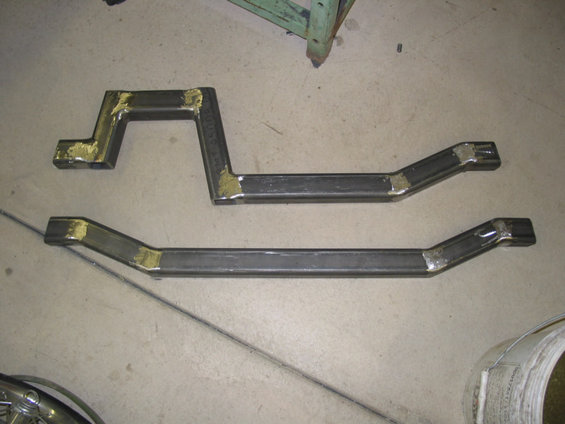
Raw crossmembers. 2 X 2 X 1/4" steel.
![Image]()
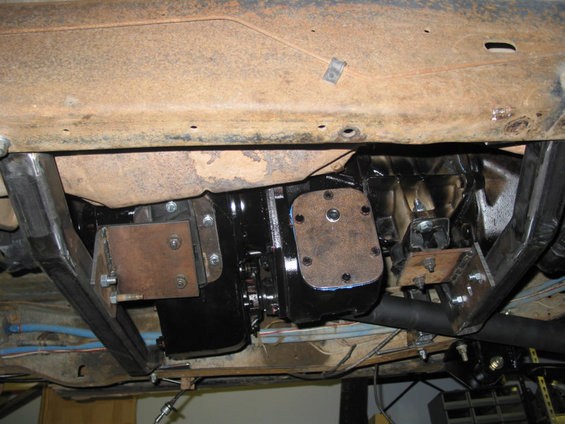
Overall view of the initial doubler mount system. Mounts are unfinished, but in final position. You can also see the new inspection covers I made for both tcases. On the far frame rail, you can see the stabilizing tabs on the crossmembers to keep them from twisting at the frame.
![Image]()
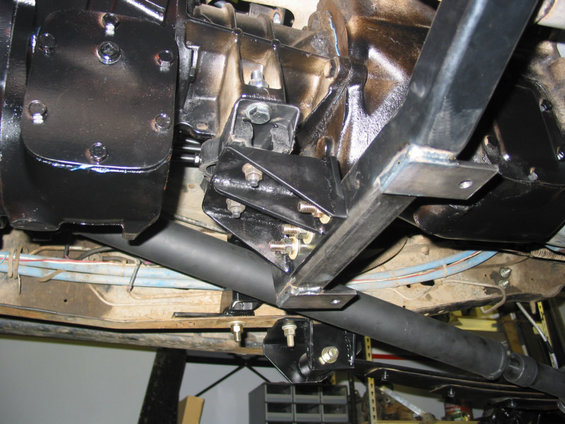
Tranny mount. Tabs added to crossmember for mounting skid plate.
![Image]()
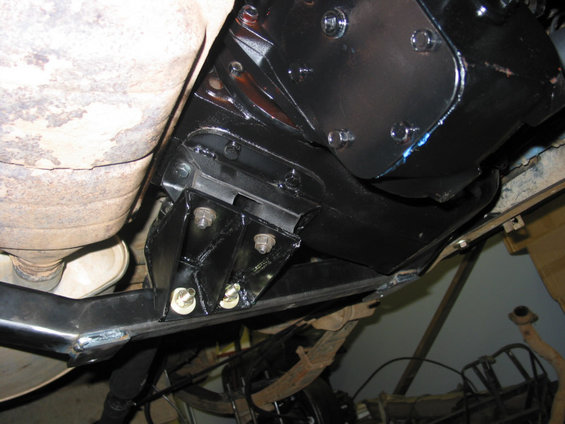
Transfer case mount:
![Image]()
It appears that the mounts are in shear, but with the offset forces there is a lot of tension on those bolts as well. All grade eight with load distributing plates added.
Once the cases are completely mounted, it's time to install the driveshafts (which will have to be custom made) and the skidplate. The final item to complete is the shifter boot. If you got by with purchases twinstick shifter, you're all set. If you made your own twinstick, and brought the shift handles through the floor together, you can use a molded rubber boot from several vendors. If you thought ahead (I never do that), you can boot a triple stick shifter with double boot and a single boot mounted separately (ORD does this.) Since my triple stick shifter handles are all bunched together, I had my understanding wife make me a shifter boot out of old jeans. It is easily water proofed and denim takes a lot of abuse. And it was free!
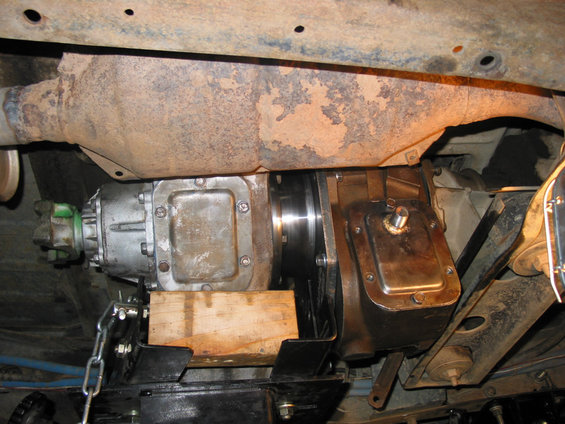
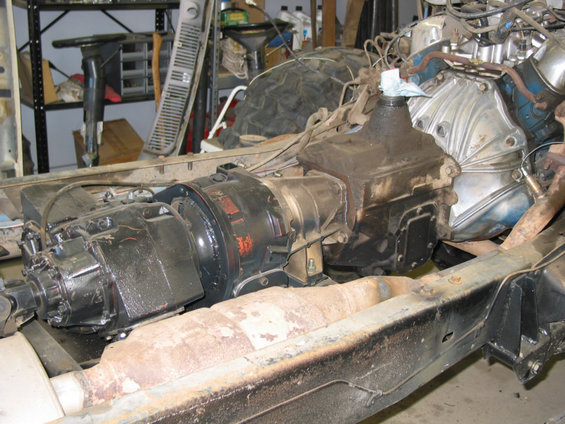
Clear view of installed drivetrain with body removed
![Image]()
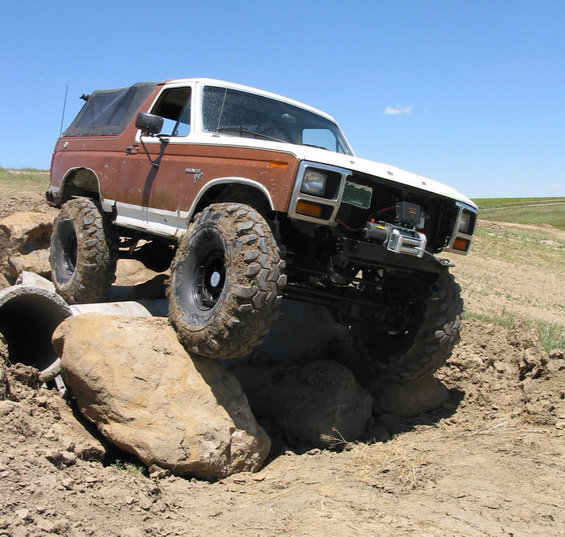
So, after a couple weeks of part time tinkering, you should now have a finished doubled transfer case installed. Get 'er on the trail and find out what ultimate control is really like!
![Image]()
More pics at my Superford page.
Not long ago, my quest for better trail performance got me looking at lower gears to slow things down a bit and to give me better control in large, steep rocks. I already had the lowest gears I wanted in the tranny and diffs, so the next step was low gears in the transfer case. Since I mainly use my rig for trail riding, a single super low transfer case was out. Because I'm a cheap bastage, bling cases were out, too. What I settled on was a 203/205 doubler kit from JED's Machining.
The JED's kit is very similar to the first generation ORD doubler in appearance. The kit includes adapter plates that mount to the NP203 and NP205 boxes and a modfied 203 range box output shaft that now serves as the intermediate shaft between the boxes. The adapters are available welded together or unwelded. I chose unwelded so I could clock the 205 to where I wanted it. The doubler gives gear ratios of 1:1, 2:1, and 4:1 with the stock gearing. With a Wagoner Machine 3:1 kit in the 203 range box, the gear ratios increase to 1:1, 2:1, 3:1, and 6:1. If you twin stick the 205 to get individual control over the front and rear outputs, you end up with a very wide variety of gearing and drive options and a whole slew of shifters sticking through the floor boards. And believe it or not, on a technical trip I use all of these options.
Close up of 205 half of doubler kit
203 side of kit showing machined intermediate shaft
The first step in installing the doubler is to prep the transfer cases. For the 205, this means cleaning and resealing, rebuilding if necessary, and twin sticking if desired. I just cleaned mine up and twinsticked it. The case was very clean inside so I chose to put off a rebuild for a while. My case came with 1310 u-joints, so I swapped my 1330 joints from my NP208 case along with the correct output shaft seals (National 473457 to fit 1 7/8 seal surface on the yoke).
The NP203 is marginally more difficult to prep. You must separate the range box from the chain box since the range box is the only part you are interested in for this project. It's a bit of a struggle to separate the two halves due to some linkage, but it's not bad. What you have to watch out for is when you pull out the intermediate shaft; roller bearings go everywhere! Once the case halves are separated, remove the shift linkage that used to connect the two halves, and clean and inspect the range box. Finally, send your intermediate shaft off to JED's with your doubler kit order.
When the doubler kit arrives, unpack the adapter plates and start putting the cases together. On the 203 side, reassemble the intermediate shaft into the bearing retainer and reinstall it into the range box. Coat the inside of the shaft with heavy wheel bearing grease and reinstall the roller bearings that came out when you disassembled the 203 boxes. Install the adapter plate onto the 203 to hold the bearing retainer and intermediate shaft in place. From what I could see, you need to reuse the gaket on the rear face of the 203 box. Don't seal things up at this point because you'll be taking all this apart again at least once.

For the 205 side, assembly is pretty easy. Attach the adapter plate and check for shift rail clearance. I had to remove quite a bit of material to get the rear output shift rail to slide fully forward. A little time with a die grinder and some polishing rolls and it worked great. Now, put a little grease on the intermediate shaft splines and joint the two cases. Make sure the adapter halves are fully seated against each other and throw on a ratchet strap to keep them there.
Fitup of all the parts.
This is the notch that needs a little massaging to clear the rear output shift rail
These next steps are really dangerous. You will be raising this 285 pound chunk of cast iron over your head on a potentially unstable tranny jack. Be sure everything is very secure and solid before jacking up the doubler. If you need to clock your 205, you'll have to do this twice. BE CAREFUL, BE SAFE!!!
Under the truck, look things over real close to see where the floorpan clearance issues might be. Remove the factory transfer case. Put the doubler assembly on a strong transmission jack and slide it under the truck. Jack the doubler into position and attach it to the tranny output. If you are clocking the 205, this is when you mock up your driveshafts and determine final positioning for the transfer case. I chose to clock the 205 even with the bottom of the 203 as seen from the side of the truck (horizontal bottom line on the driveline assembly). This required me to raise the 205 about 2 inches at the front output shaft. You can order the doubler kit with this 2" raise already done if desired. Mark the adapter halves relative to each other so you can line them up later and remove the doubler from the truck. This is also a good time to measure for new driveshafts and get them ordered.
Back on the bench, separate the two cases and remove the adapter plates. Be careful not to pull out the intermediate shaft and lose all the bearings again. Put the adapter halves back together with the witness marks you made earlier aligned and place the whole works into a press. (You can do this by piling on weights as well, but a press works quite well). Clamp the two halves firmly together (JED's recommends 600 pounds minimum), and tack the adapters together. I chose to finish the welding with the adapter in the press and left it in there to cool as well.
On the bench again, install the adapter to both cases. Be sure to include the 203 rear face gasket. Silicone everything and use Permatex #2 on the bolts. My doubler is leaking at several bolts and will need to be removed for resealing. It's not a job you want to do over and over, seal it up the first time. By this time, you will have noticed that you don't have a check and fill plug for the 203. There are several options for dealing with this. What I chose to do was make a new cover out of 1/4" steel which I drilled and tapped for a 1/2" pipe plug between the top bolt holes. I made a similar plate for the 205, but omitted the fill plug.
Adapter welded up and the doubler halves joined. The yokes have not been swapped in this pic.
Now you have to deal with shifters. I've included pictures of mine, but there are so many possibilities that it's pointless to go into detail. The easiest situation is if you did NOT twinstick the 205. You can buy a twinstick (203/205) shifter from several places which make the shifter a true bolt-on solution. If you did twinstick the 205, your shifter design depends on how you want the levers ordered, how much you're willing to hack up the floor, and whether or not you want a stock appearance or if the shifters can just wind up anywhere. I wanted my shifters to mount in the stock location, to come up through the factory transfer case shifter hole, and to be ordered rear-front-crawler. Of course, this is about the most difficult setup to put together, and it took me two or three weeks of head scratching and modeling to find a solution that didn't bind and didn't interfere with other components.
Finished shifters. It took a long time to get to this point.
Once you have the cases bolted together, sealed, shifters done, and yokes installed, it's time for a final cleaning and painting. Now we head back under the truck, hopefully for the last time.
The final set of steps after installing the transfer cases are to make up the crossmembers. As I mentioned, the doubler assembly weighs 285 pounds. The tranny and tranny adapter are not designed to carry this load. Therefore, you need a tranny crossmember, a doubler crossmember, and a torque arm to keep from transmitting output torque back through the tcases, tranny, engine, and engine mounts. If you have a low lift, you should be able to reuse the stock tranny crossmember. There are several ways to build the tcase crossmember, the easiest of which is probably to weld something to the 203 adapter plate. As for a torque arm, Ford has us covered there. Just use the stock 205 frame mount, it works great.
Ford NP205 frame mount. It's tight with the fuel injection and brake lines in there.
Unfortunately, with my lift (6 - 7 inches), I had to build a tunneled tranny crossmember which now interfered, no, blocked, my transfer case shifters. This meant I had to move the tranny crossmember forward to clear the shifters. I also didn't want to pull the doubler out to weld new mounts onto the adapter, so I needed a creative solution for the transfer case crossmember. Past experience with a couple skid plates taught me that the frame must be allowed to flex or bolts come loose and things fall apart. So, what I chose to do was to use skinny crossmembers mounted outboard the tranny/transfer case assembly. The mounts would try to twist the crossmembers, so they would be braced against the frame and gusseted with the skid plate. I used a GM transmission mount for the tranny, and another bolted and welded to the 205 inspection plate I had made to mount the tcases. It's a funky setup, but so far works OK. I will be replacing it eventually as I don't trust it to hold up over time, but for now it gets me on the trail.
Raw crossmembers. 2 X 2 X 1/4" steel.
Overall view of the initial doubler mount system. Mounts are unfinished, but in final position. You can also see the new inspection covers I made for both tcases. On the far frame rail, you can see the stabilizing tabs on the crossmembers to keep them from twisting at the frame.
Tranny mount. Tabs added to crossmember for mounting skid plate.
Transfer case mount:
It appears that the mounts are in shear, but with the offset forces there is a lot of tension on those bolts as well. All grade eight with load distributing plates added.
Once the cases are completely mounted, it's time to install the driveshafts (which will have to be custom made) and the skidplate. The final item to complete is the shifter boot. If you got by with purchases twinstick shifter, you're all set. If you made your own twinstick, and brought the shift handles through the floor together, you can use a molded rubber boot from several vendors. If you thought ahead (I never do that), you can boot a triple stick shifter with double boot and a single boot mounted separately (ORD does this.) Since my triple stick shifter handles are all bunched together, I had my understanding wife make me a shifter boot out of old jeans. It is easily water proofed and denim takes a lot of abuse. And it was free!
Clear view of installed drivetrain with body removed
So, after a couple weeks of part time tinkering, you should now have a finished doubled transfer case installed. Get 'er on the trail and find out what ultimate control is really like!
More pics at my Superford page.


